
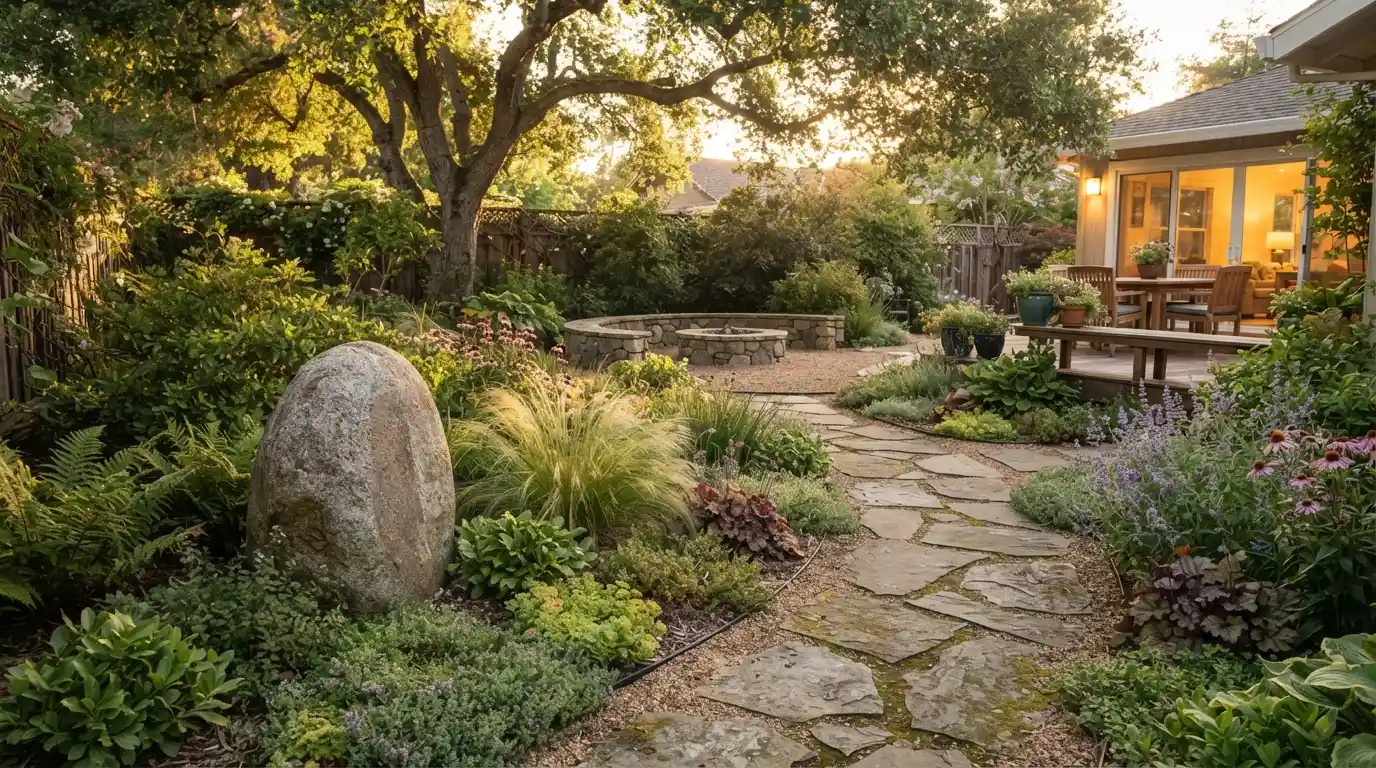
We tore out our lawn two summers ago. I went in thinking landscaping just meant picking plants, which, apparently, is exactly the wrong place to start. Our designer, Priya, corrected that fast. What she introduced me to is something she calls landscape morphing, this idea that a garden should shift with the seasons and with how people actually move through it, not just sit there frozen as one arrangement forever.
Landscape ideas from morph, the way she explained them anyway, start with the bones of a space long before anyone picks a plant. Below is what that actually looked like in our own yard, what it cost, and a few things I’d have done differently knowing what I know now.
Why Landscape Ideas From Morph Start With Structure, Not Plants
I showed up to our first meeting with a folder of plant photos, fully expecting Priya to start talking soil types and bloom seasons. She barely opened it. Structure first, always, she said, the paths, the walls, the zones where people will actually sit and eat and walk. Plant selection comes after all that gets settled, not before. Landscape ideas from morph treat the yard almost like an extension of the house itself rather than some decorative afterthought tacked onto the back door.
We had this awkward dead strip running along the fence line, never used it for anything in three years living there, and Priya said that’s usually exactly where the structural thinking gets skipped, people just plant something and hope for the best.
What Morphic Garden Design Actually Means in Practice
Morphic garden design isn’t really about a specific look, Priya kept insisting. It’s more a way of reading a site before touching it at all, watching where light falls at different hours, where water pools after rain, where your own feet want to walk without some path telling them to. Two full weekends just observing the yard, doing nothing, before she sketched a single line. Felt excessive at the time, honestly. Made total sense once the plan finally came together.
Reading Light, Water Flow, and Foot Traffic Before Building Anything
The real turning point came from watching where water pooled during one heavy spring storm. There’s a low corner near the garage that stayed soggy for two full days afterward, and we’d just accepted that as normal for years without questioning it once. Instead of fighting it, Priya turned it into a small rain garden. Thrives without us ever watering it now, ironically the one part of the yard that takes zero maintenance.
Hardscaping Elements That Give a Yard Its Bones
Hardscaping ate more of our budget than plants did, and Priya warned me about that early, which I appreciated, no surprise sticker shock later. Retaining walls, stone paths, a small patio, all of it goes in first since everything downstream in the design has to work around what’s already in the ground. She kept calling it “garden grammar,” the way paths and walls aren’t purely functional, they’re what makes a yard read as intentional rather than thrown together over a weekend. Curved pathways came up constantly in our planning talks. A straight path shows you everything in one glance. A curved one holds something back, you can’t actually see what’s around the bend until you’re standing there.
Stone Paths, Curved Walkways, and the Illusion of Space
Irregular stone through gravel mulch, not poured concrete, mostly because Priya said the gaps between stones trick a small yard into feeling deeper than it actually is. Our path bends gently around one large existing oak instead of cutting straight to the back fence. People genuinely comment on how big the yard feels, and it’s sixty by forty feet, nothing enormous.
Using Boulder Placement and Focal Points to Anchor a Design
One oversized boulder near the new patio does more visual work than I’d have guessed a single rock could pull off. Sourced from a local stone yard. Positioning it took an entire afternoon, shifting it inches at a time until it finally looked like it had always been sitting there, untouched. That’s the trick apparently, it has to look geologically inevitable, not decorated on top of the ground.
Zoning Your Yard Into Functional Outdoor Rooms
This part changed how we actually use the backyard day to day, more than anything else in the whole project. Instead of one undivided lawn, Priya split the space into distinct zones, dining near the kitchen door, a fire pit further back, a quieter reading corner tucked behind taller planting. Each zone gets designed around its own function instead of everything competing for the same flat patch of grass. We barely used our old backyard beyond mowing it. Now every zone gets used differently depending on the hour or who’s over.
Fire Pits, Dining Areas, and Quiet Corners
The fire pit ended up on a gravel circle with a low stone wall ringing it, about eighteen inches, apparently that’s the sweet spot height where most people can sit without needing a cushion under them. Getting food out to the dining table is a lot less annoying now too, wide stone patio straight off the kitchen door, no more balancing plates across wobbly stepping stones like I used to. Funny thing is the quiet corner almost didn’t happen, Priya threw it in near the end of planning almost as filler, and now it’s the one spot back there I actually use most days.
How Indoor-Outdoor Flow Changes the Whole Layout
Priya really wanted us to widen the old sliding door into more of a proper opening, said the flow between kitchen and patio works better without any real threshold breaking it up. Budget said no, so we skipped that part. Did end up loosely echoing our interior tile pattern out in the new patio stone though, small thing, barely cost anything extra, and somehow it makes the whole back of the house read as bigger than it actually measures out to be.
Layered Planting: Canopy, Mid-Story, and Ground Cover
This is where plants finally showed up in our conversations, and honestly I’d never thought about a garden in layers before this. Up top, the canopy handles shade and gives the space its vertical shape. Below that, shrubs and ornamental grasses in the mid-story bring in movement, catch the wind, add texture. Down at the bottom, ground cover knits the whole thing together at eye level.
Priya says each layer pulls its own ecological weight too, different insects and birds use each one differently, and the payoff is a garden that looks interesting from basically any angle instead of one flat wash of color. Our single mature oak became the anchor for the whole canopy, everything else got built outward from that one tree.
Choosing Native Plants for Long-Term Success
Almost everything in the new beds is native now, mostly grasses and perennials that already know how to survive our actual weather instead of imported stuff that would’ve spent every season fighting the soil. Priya kept it simple when explaining why. Less babying once established, and they actually feed the local pollinators, something the imported ornamentals we used to have never really did.
Seasonal Perennials and Ornamental Grasses for Year-Round Interest
Even a light breeze sets the tall grasses moving, constant motion out there now which the old lawn obviously never had. Priya picked varieties specifically for holding their shape through winter, no turning to mush the second frost hits like some grasses do. Perennials fill in the spaces between, blooming at staggered times, so there’s basically always something worth looking at whatever month it happens to be.
Xeriscaping and Water-Wise Choices Worth the Upfront Cost
Water use kept coming up in every planning conversation, mostly because it turned out our old lawn had been quietly draining our summer water bill for years and neither of us had bothered checking the actual numbers until this project made us look. Turns out xeriscaping isn’t wall-to-wall gravel and cactus, which is honestly what I pictured before starting. It just means the whole landscape needs less irrigation to survive, full stop. For a yard our size, total cost lands somewhere between $5,000 and $24,000, and the return usually shows up in three to five years through lower water bills. Easier pill to swallow once Priya actually walked me through the math on paper.
What Xeriscaping Actually Costs and What You Get Back
If you hire it out, about 500 square feet runs $3,500 to $9,165. Doing it yourself brings that down to somewhere around $4,500 to $5,500, depends heavily on materials and whether you’re adding drip irrigation or skipping it. The Alliance for Water Efficiency has clocked roughly 50 percent water reduction with xeriscaping compared to a regular lawn, and sure enough our own bill noticeably dropped by the second summer.
Rebate Programs and Turf Replacement Incentives
California homeowners can tap programs like the Santa Monica rebate, $3.50 per square foot toward turf replacement, capped at $6,000 under California Title 24. We weren’t eligible, living outside that specific program’s reach, but Priya said checking local utility rebates first costs maybe ten minutes and plenty of municipalities run something similar now.
Conclusion
Two summers in, and the backyard barely resembles what we started with. Not just prettier, actually used now, every corner of it, which the old flat lawn never managed no matter how well we kept it mowed. Structure before plants, water use decided early, that order made more difference than I expected walking into this. If you’re about to start your own yard project, do yourself a favor and just sit out there a weekend first, watch how the space actually behaves before you commit to where anything goes.
FAQs
Landscape morphing treats a garden as something that shifts with seasons and use instead of a fixed, permanent layout, prioritizing structure and site conditions before plant selection. Traditional approaches often start with plants first, which can leave the underlying layout feeling like an afterthought.
Total xeriscaping costs generally fall between $5,000 and $24,000 depending on size and materials, with professional installation for a 500-square-foot area running $3,500 to $9,165. Most homeowners see a return within three to five years through reduced water bills.
Many core ideas, like observing sun and water patterns before planting or building around one clear focal point, translate well into DIY projects. A professional becomes more valuable for structural elements like retaining walls or larger hardscaping where drainage and grading actually matter.
Native plants suited to your specific climate generally perform best across all three layers, canopy, mid-story, and ground cover, since they need less irrigation once established. Ornamental grasses and seasonal perennials add movement and year-round interest between the larger structural plantings.