

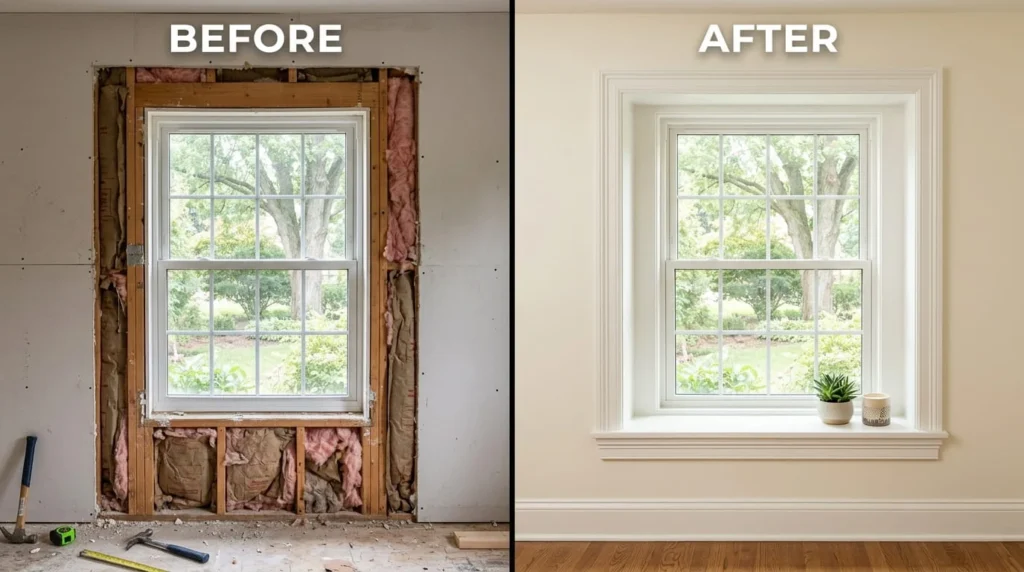
There is a moment in every renovation when the walls are painted, the floors are done, and something still feels off. Nine times out of ten, it is the windows. Bare window frame edges sit against raw drywall with no transition, no definition just a gap that the eye cannot settle on. That is exactly what window casing solves. It is the interior trim that bridges the rough window opening and the finished wall, and it does more for a room than most people give it credit for.
I have done enough finish carpentry to know that trim is never just decorative. It hides the framing, covers the insulation gap, and locks the window frame into the wall visually. The window trim is the last thing you install and the first thing visitors notice whether they realize it or not.
Why Window and Door Casing Work as One System
Experienced designers treat window casing and door casing as a unified system. Both belong to the same trim package, and when they share the same casing profile, the room gains visual continuity that is hard to achieve any other way. The eye moves from door opening to window opening and finds the same language repeated. That repetition creates a cohesive look that no amount of furniture rearranging can fake.
Kristi Linauer of Addicted 2 Decorating built an entire design philosophy around this idea. Her before and after room transformations show consistently that matching window trim to door casing using the same trim profile throughout is what separates a finished room from a furnished one. The interior design principle is simple: repeat the detail, trust the system.
Reading the Window Before You Touch a Board
Every successful trim installation starts with accurate window measurements. Write down the opening height, opening width, and the depth from the face of the drywall to the face of the window frame. That depth affects which casing profile sits flush and which one fights the wall.
Check the jamb both the side jamb and top jamb with a bubble level and speed square. If anything is not level, not plumb, or not square, fix it before cutting a single board. Shimming corrects small errors cheaply. A shim behind a crooked side jamb costs nothing. Skipping it costs you tighter joints and a refined finish that you will never fully achieve on a tilted frame. This step matters whether you are doing DIY installation or paying for professional installation.
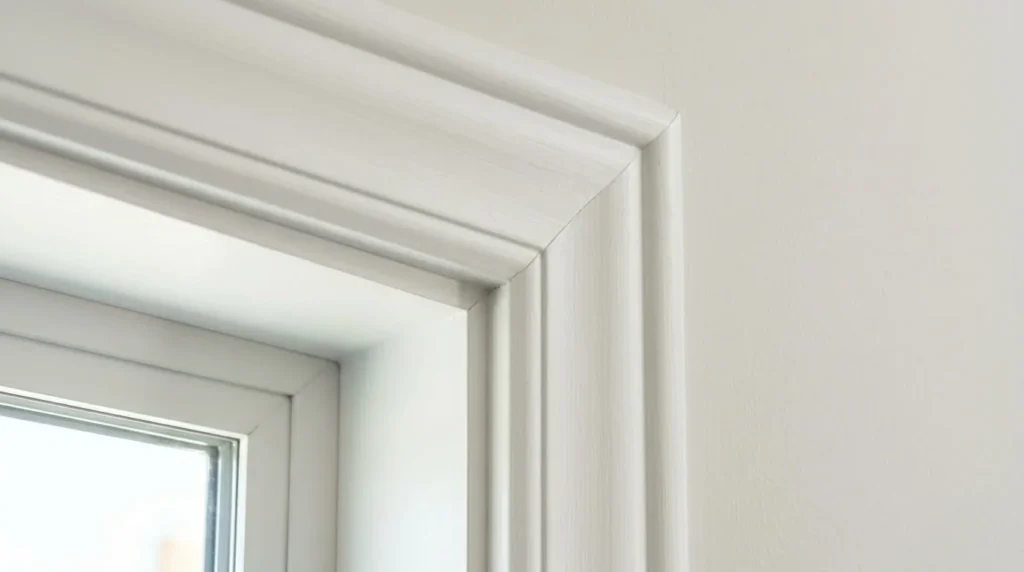
Setting a Reveal That Holds the Whole Look Together
The reveal is the small offset between the inside edge of the jamb and the face of the side casings. A 1/4 inch reveal is the industry standard. It creates a deliberate shadow line and hides any minor imperfection where the jamb meets the window frame. What makes or breaks a job is the consistent reveal same measurement on every edge, every window, every door in the room.
Mark it with a sharp pencil before nailing anything. Use a small combination square set to 1/4 inch and drag it along the jamb edge, leaving a light pencil line. That line is your casing edge. Follow it exactly. A 1/2 inch error in reveal looks like carelessness. A consistent reveal looks like craftsmanship.
Choosing the Right Casing Profile for the Space
The casing profile determines the entire personality of the window trim. A narrow profile disappears into the wall clean, quiet, modern. A wide casing makes a statement. Wider options add visual weight, which works well in rooms with generous ceiling height and long wall span.
Colonial casing
Colonial casing is the most widely used profile in North American homes. Simple, slightly tapered, and symmetrical it fits classic homes, craftsman, farmhouse, and colonial styles without effort. Beaded casing adds a small groove near the inside edge that catches light and adds texture without bulk. Fluted casing cuts vertical channels across the face more formal, suited to traditional interior rooms with tall windows and detailed millwork. Reeded casing is the reverse raised ridges instead of channels and reads even heavier in a room.
Streamlined modern casing
For a modern interior, streamlined modern casing with flat faces, clean lines, and crisp edges is the natural choice. Stepped casing built from layered flat boards adds depth without curves and suits open layout spaces where the windows are visible from multiple angles. Symmetric casing works anywhere the window sits centered on a wall with equal visual exposure on both sides.
Header casing
The header casing pulls significant design weight. A strong decorative header above the window sometimes built as a separate decorative trim piece set proud of the side casings adds height and formality. It makes a standard window read like an architectural feature. This detail alone can transform a flat, forgettable wall into a focal point.
Materials: Making the Choice That Matches the Budget and the Finish
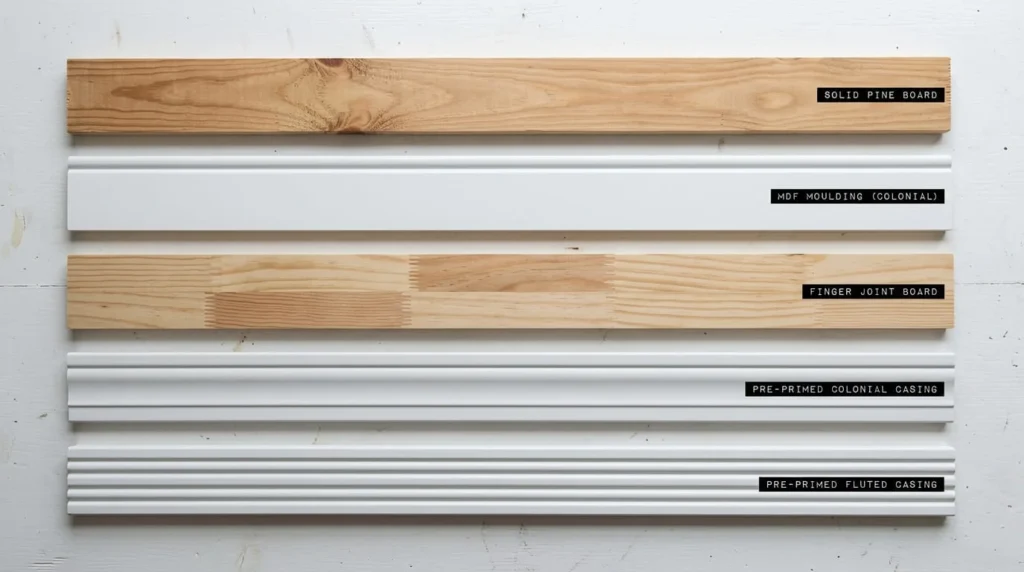
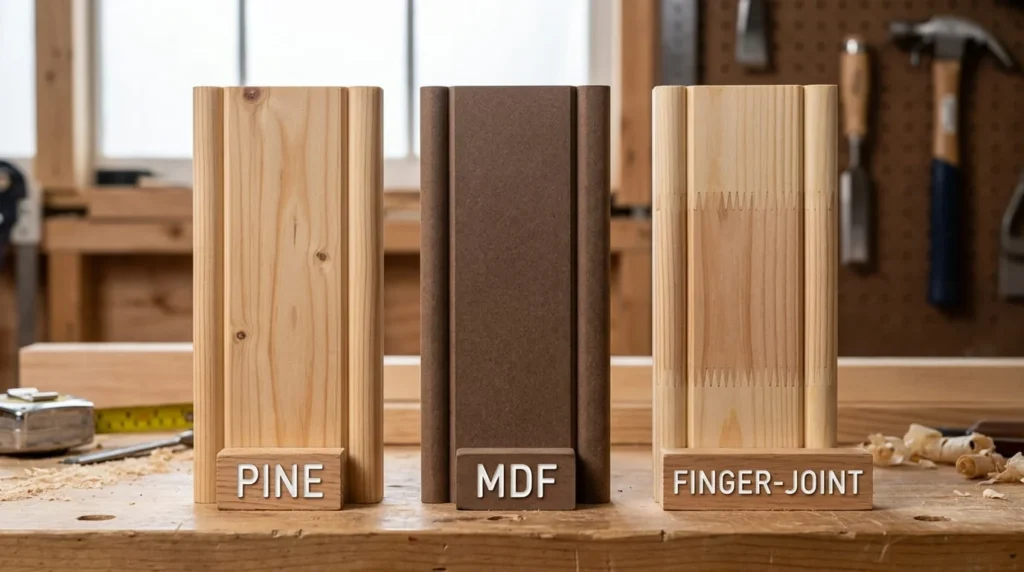
Wood casing in pine is the starting point for most home improvement projects. Pine is light, affordable, easy to cut, and takes both painting and staining well. A stained finish reveals the natural grain and gives the trim a warm finish that suits farmhouse and craftsman interiors. A painted finish produces smooth surfaces and crisp edges the standard for modern interior and colonial settings.
MDF mouldings have become the dominant choice for painted finish work. They hold consistent dimensions across every board, accept miter cuts cleanly, and produce tighter joints than knotty or slightly warped pine. They do not tolerate moisture well, so never use them on a window sill or near condensation-prone glass. Finger joint boards small pine pieces glued and pre-primed sit between solid pine and MDF mouldings in both cost and performance. They arrive ready to paint and resist cupping better than wide solid boards.
For historic preservation work or a custom look that matches original millwork, solid wood casing or custom moulding is often the only option. Mouldings One out of Middlefield Ohio specializes in matching period profiles that big box stores simply do not carry.
Lumber Sizes, Dimensions, and What They Cost
Knowing your lumber sizes before ordering saves time and eliminates waste. 1×2 is used for thin layering in stepped casing builds. 1×3 is the most common side casings width for basic trim installation. 1×4 works for slightly wider profiles. 1×6 suits bold, wide casing designs in rooms with high ceiling height.
Finished widths vary by profile. Common measurements include 2.5 inches for narrow profile styles, 4 inches for standard colonial casing, and 4.25 inches for slightly wider traditional profiles. Cut lengths depend on your specific windows a typical installation might call for side casings at 48 7/8 inches and a header casing at 57 3/8 inches, but always pull your own numbers first.
When calculating ordering quantities, add 5 to 10 percent to your total linear footage. Bad cuts happen. Miter cuts occasionally split. Running short mid-project means a special trip and potential restocking costs that cost more than the buffer would have. Measure twice, order once with margin.
Pricing at Home Depot spans a wide range depending on profile and material. Entry-level MDF mouldings and basic pine profiles start at $1.81 and $1.82 per linear foot. Mid-range options run $1.85, $1.87, and $1.91. More detailed profiles land at $2.04, $2.14, $2.21, and $2.28. Decorative and specialty styles push into $2.50, $2.77, and $2.84 territory. Premium and custom moulding profiles run $3.30, $3.31, $3.83, and up to $4.18 per linear foot. For a full trim package across multiple rooms, these numbers compound quickly knowing them before planning prevents budget surprises.
Tools That Actually Matter on the Job
A clean trim installation does not need a full workshop. The essential list is short. A miter saw handles the vast majority of cuts miter cuts at 45 degrees for wrapped corners, square cuts for no miter cuts styles. A jigsaw cuts around obstacles. A table saw rips boards to custom widths when wider options are not available off the shelf.
For fastening, a nail gun loaded with 16-gauge nails drives through thicker stock cleanly. 18-gauge nails and finish nails work better on thinner trim where 16-gauge nails might split the edge. Both DeWalt and Porter Cable make dependable cordless nailers that handle interior trim installation without compressor hassle. After nailing, a nail set and hammer sink every head below the surface for clean filling.
Wood glue at joints adds strength before nailing particularly useful on miter cuts that tend to open with seasonal movement. Apply glue, clamp briefly, then nail. The joint will hold through years of expansion and contraction.

Sealing, Filling, and Finishing the Right Way
After installation, wood filler goes into every nail hole and minor gap. Let it dry fully before sanding rushing this step shows under paint. Sanding to 150 grit smooths filler flush with the face of the trim. For MDF mouldings, sealing the cut ends before priming prevents swelling if any moisture reaches the material.
Priming is not optional on raw pine or uncoated lumber. Without it, grain bleeds through and the painted finish looks rough no matter how many topcoats go on. Caulk fills the gap between the casing face and the drywall use paintable caulk for this. DAP Alex Fast Dry is the most reliable choice for interior trim installation: it dries in under 30 minutes and takes paint without cracking. Latex caulk works for general gaps. Silicone caulk seals around the window sill and stool where moisture is a real concern but it cannot be painted over, so placement matters.
The stool and apron complete the lower assembly. The stool is the flat interior ledge at the base of the window frame. The apron hangs below it against the wall. Together they ground the entire window trim composition. Without them, even well-executed side casings and header casing feel unfinished.
Painting or staining closes the job. Two coats of quality trim paint over a solid priming base produces smooth surfaces that hold up through daily life. For staining, sand to 220 grit and apply evenly staining only works on real wood casing and solid pine. MDF mouldings and finger joint boards are painted finish only.
Matching Style to the Room and the Home
Proportion and architectural style should guide every decision. A small window in a tall room needs wide casing and a strong header casing to hold visual presence. A wide window in a low-ceilinged room benefits from a narrow profile that does not compete. The depth of the profile relative to wall span and ceiling height determines whether the trim feels right or fights the space.
Classic homes suit colonial casing, fluted casing, and formal decorative header details. Craftsman and farmhouse interiors call for flat, layered stepped casing with no miter cuts and a plinth block where the side casings meet the baseboard moulding. Modern interior spaces want streamlined modern casing flat, thin, and precise. Backband moulding added to the outer edge of any profile builds it out and adds visual weight without redesigning the whole trim profile.
For addition projects and whole-house renovation work, the goal is always matching the existing millwork same casing profile, same depth, same proportion. Visual continuity through a home increases curb appeal and long-term value equally. A room makeover that includes new decorative trim consistently outperforms one that only changes paint or furniture. The step by step investment in proper window casing from rough window opening through painting is one of the highest-return efforts in home improvement.
Conclusion
Window casing is one of those design elements that accomplishes everything without saying much. It fills up the empty space, forms the window frame, holds the trim elements, and completes the entire room.
No matter whether you decide on colonial casing, fluted casing, or sleek modern casing; no matter if you use pine boards, MDF moulding, or finger-jointed wood the guidelines will remain unchanged. Measure precisely. Establish an even reveal. Make neat mitre cuts. Nail, caulk, sand, prime, and paint.
All the difference between a room that feels complete and one that doesn’t can be made through this single design element. Do your best. Get the trim right.

4 thoughts on “Window Casing by Dr Homey – The Complete Guide to Trim, Profiles, and Installation Done Right”